
Are you frustrated with tiles falling off walls or floors cracking unexpectedly? These problems often stem from improper use of tile adhesive, costing time and money to fix.
Tile adhesive is a specialized mortar used to bond tiles to surfaces. Quality adhesive contains key ingredients like HPMC and RDP that provide water retention, workability, and flexibility. Understanding these components helps prevent common installation failures and ensures long-lasting tile installations.
Getting your tile project right the first time saves not just money but also the headache of repairs. I've seen countless projects fail because people didn't understand these basics about tile adhesive. Let's explore the most common issues and how to fix them.
Why Should You Use Tile Adhesive?
Do you wonder if regular cement would work just as well for your tiling project? The short answer is no - and using the wrong material can lead to expensive failures.
Tile adhesive is specially formulated with additives like HPMC1 and RDP that provide superior bonding strength, flexibility, and water resistance compared to regular cement. These properties are essential for withstanding temperature changes, preventing cracks, and ensuring tiles stay in place for years.
I remember visiting a client who had used regular cement to install bathroom tiles. Within six months, almost 40% of the tiles had come loose due to moisture issues. Tile adhesives are designed with specific components that make them ideal for different applications.
The main ingredients include cement, sand, and crucial additives like Hydroxypropyl Methylcellulose (HPMC) and Redispersible Polymer Powder (RDP).
HPMC improves water retention, which gives the installer more working time and ensures proper cement hydration. RDP adds flexibility and bonding strength, especially important in areas with temperature fluctuations or moisture exposure.
Different types of tile adhesive2s are formulated for specific applications:
| Adhesive Type | Best For | Key Features |
|---|---|---|
| Standard Cement-Based | Indoor wall and floor tiles | Good bonding, economical |
| Flexible Adhesive | Areas with temperature changes | Contains more RDP, resists cracking |
| Rapid-Set Adhesive | Projects needing quick completion | Faster setting time, higher cost |
| Waterproof Adhesive | Bathrooms, showers, pools | Enhanced water resistance |
The right adhesive can mean the difference between a lasting installation and a failed project that requires complete removal and reinstallation.
Dealing with Excessive Tile Water Immersion
Have you noticed your tiles becoming loose in areas frequently exposed to water? This common problem often stems from using the wrong adhesive type for wet environments.
For areas with high water exposure, use waterproof tile adhesive with enhanced polymer content. These specialized formulations create a water-resistant bond that prevents moisture from compromising the adhesion. Standard adhesives can deteriorate when constantly exposed to water, leading to tile failure.

Water immersion represents one of the biggest challenges for tile installations, especially in bathrooms, kitchens, and outdoor areas. I once consulted on a shower renovation where the previous installer had used standard adhesive, resulting in complete failure within just two years.
The science behind water damage is straightforward - when regular adhesive is repeatedly exposed to moisture, the cement components can gradually dissolve and lose their bonding properties. Additionally, water can seep behind tiles and create pressure that pushes tiles outward as it evaporates.
The solution involves both proper material selection and installation techniques:
Preventing Water Damage in Tile Installations:
- Adhesive Selection: Choose adhesives with high polymer content (more RDP) specifically labeled for wet areas. Look for C2 or C2TE ratings per international standards.
- Waterproofing Membrane: Always apply a proper waterproofing membrane before tiling in wet areas. This creates a barrier that prevents moisture from reaching the substrate.
- Proper Mixing: Follow manufacturer instructions exactly - too much water in the mix significantly reduces water resistance.
- Complete Coverage: Ensure 100% coverage of adhesive on the back of tiles in wet areas by using the proper trowel size and technique.
For existing installations showing signs of water damage, partial repair may be possible if caught early. However, extensive water damage usually requires complete removal and reinstallation with appropriate materials.
Can Tile Adhesive be Used for Grouting?
Have you ever run short of grout and wondered if tile adhesive could work as a substitute? This common misconception can lead to serious issues down the line.
Tile adhesive cannot be used for grouting. Adhesive lacks the necessary fine particle size, color stability, and water resistance required for grout. Using adhesive as grout will result in cracking, discoloration, water penetration, and difficult cleaning. Always use proper grout for filling joints between tiles.

I once visited a DIY project where the homeowner had used leftover adhesive for grouting. Within weeks, the joints were cracking and collecting dirt. While both products contain cement, they serve entirely different purposes and have very different formulations.
Tile adhesive is designed to create a strong bond between the tile and substrate. It contains coarser aggregates and additives optimized for bonding strength. Grout, by contrast, is formulated with finer particles to flow easily into narrow joints, resist staining, and provide water resistance in the small exposed areas between tiles.
The key differences make these products non-interchangeable:
| Characteristic | Tile Adhesive | Grout |
|---|---|---|
| Particle Size | Coarser | Fine |
| Shrinkage | Higher | Lower |
| Color Stability | Not designed for exposure | UV and stain resistant |
| Water Resistance | Varies by type | High in quality grouts |
| Setting Time | Typically longer | Faster surface drying |
| Flexibility | Higher with polymer-modified types | Lower, but crack-resistant |
Using adhesive as grout creates several problems: it shrinks more, causing cracks; lacks stain resistance, leading to discoloration; has poorer water resistance, allowing moisture penetration; and its rough texture collects dirt and makes cleaning difficult.
The proper approach is always to use products for their intended purpose. Modern grouts come in many varieties including sanded, unsanded, epoxy, and urethane-based options, each designed for specific joint widths and exposure conditions.
Role of RDP and HPMC3 in Tile Adhesive
Are you confused about why some tile adhesives perform so much better than others? The secret often lies in two critical additives that many don't understand: RDP and HPMC.
RDP (Redispersible Polymer Powder) improves adhesion strength, flexibility, and shock resistance in tile adhesive. HPMC (Hydroxypropyl Methylcellulose) enhances water retention, workability, and open time. Together, these additives transform basic mortar into high-performance tile adhesive capable of withstanding stress and preventing failures.

In my factory visits with clients, I often demonstrate how dramatically these additives improve adhesive performance. Without them, even the best cement mixture would fail for modern tiling applications. Understanding these components helps select the right product for specific needs.
RDP (Redispersible Polymer Powder)4:
RDP consists of polymer particles that redisperse in water during mixing. When the adhesive dries, these polymers form a flexible network throughout the cement matrix. This network provides several critical benefits:
- Enhanced adhesion - Creates stronger bonds to difficult surfaces like existing tiles or smooth concrete
- Flexibility - Absorbs building movement and thermal expansion without cracking
- Impact resistance - Prevents tiles from detaching when subjected to impacts
- Water resistance - Reduces water penetration through the adhesive layer
Higher-quality adhesives contain more RDP (typically 2-5%), making them suitable for challenging applications like exterior walls, floors with heating systems, or large-format tiles.
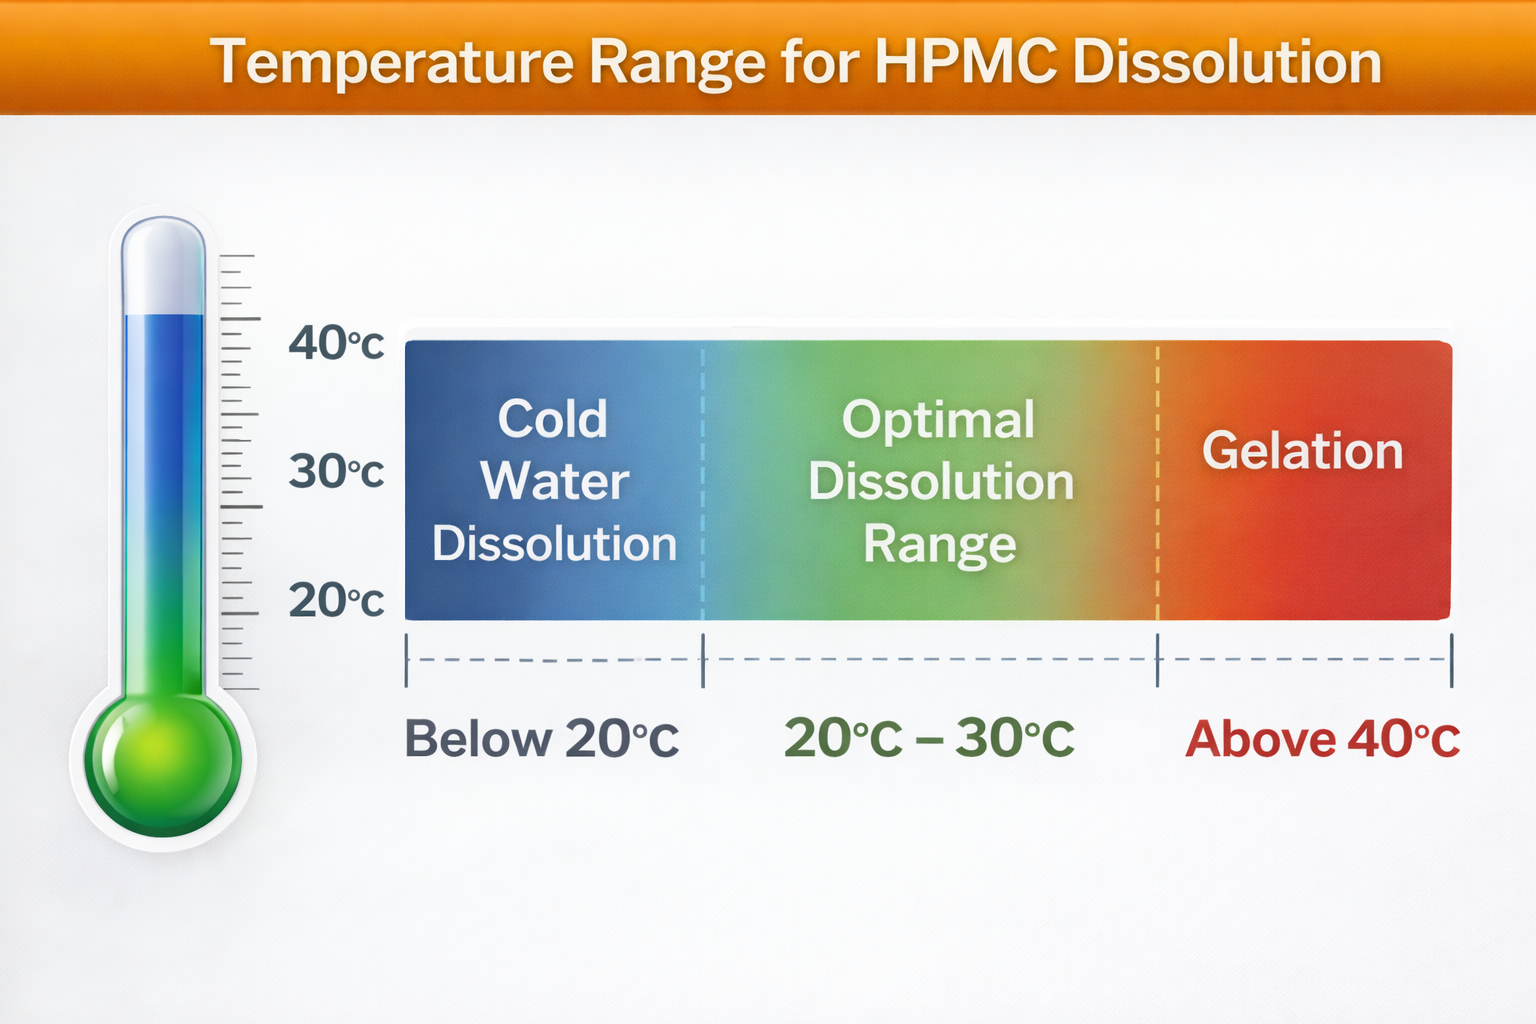
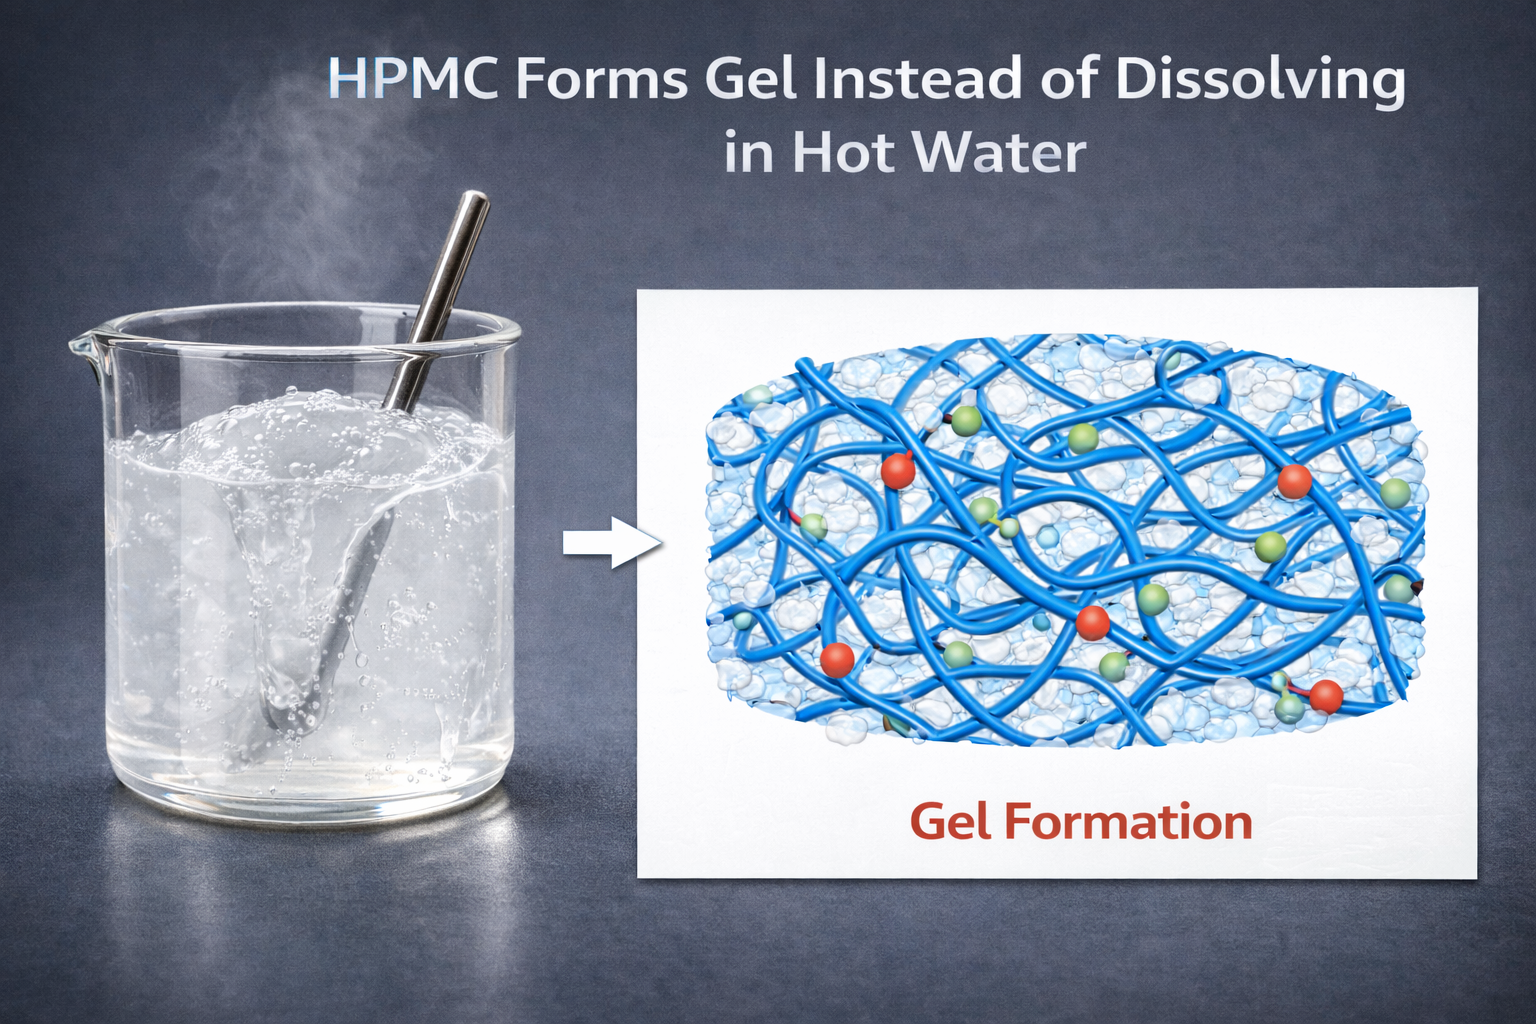
HPMC (Hydroxypropyl Methylcellulose)5:
This cellulose derivative transforms how the adhesive behaves during application:
- Water retention - Prevents premature drying by holding water in the mixture
- Extended open time - Gives installers more working time before the adhesive skins over
- Improved workability - Makes the adhesive smoother and easier to trowel
- Sag resistance - Helps adhesive support heavy tiles without slipping on vertical surfaces
The quality and percentage of HPMC directly affects how long the adhesive remains workable and how well it maintains the proper moisture level for cement hydration.
For demanding applications, I always recommend adhesives with optimal combinations of both additives. Premium exterior-grade adhesives typically contain higher percentages of RDP for flexibility and weather resistance, while those for large-format tiles need excellent HPMC for extended open time and sag resistance.
What to Do When Facing Challenges with Tile Adhesive Application?
Have you ever mixed a batch of tile adhesive only to find it too stiff, too runny, or setting before you can place all your tiles? These common application issues can ruin your project.
When facing adhesive application problems, first check your mixing ratio and adjust water amount for proper consistency. For premature drying, work in smaller sections and use adhesive with longer open time. For poor adhesion on smooth surfaces, apply a primer or scratch coat first. Always read manufacturer instructions before mixing.

I remember helping a contractor who was struggling with tiles sliding down the wall during installation. By adjusting his technique and adhesive choice, we solved the problem immediately. Application challenges are common but usually have straightforward solutions.
The most frequent application issues include:
1. Incorrect Consistency
- Too Stiff: Add small amounts of water gradually while remixing
- Too Runny: Add more dry adhesive powder or let sit for 5-10 minutes before remixing
- Proper Test: Adhesive should hold trowel ridges without slumping but spread easily
2. Premature Drying (Skinning Over)
- Work in smaller sections, especially in hot/dry conditions
- Dampen the substrate slightly (not soaking wet) in very dry conditions
- Choose an adhesive with extended open time (look for "E" designation in classification)
- Avoid application in direct sunlight or windy conditions when possible
3. Poor Bonding to Substrate
- For smooth or non-porous surfaces (like existing tiles), use a primer or bonding agent
- Create a "scratch coat" by applying a thin layer of adhesive and allowing it to partially set
- Ensure proper substrate preparation - surfaces must be clean, stable and free of contaminants
4. Adhesive Sag with Heavy Tiles
- Use adhesive specifically rated for heavy tiles or large formats
- Apply using proper notched trowel size for the tile dimensions
- Consider the "buttering" technique (applying adhesive to both substrate and tile)
- Install tiles from bottom up on walls, using temporary supports if necessary
5. Hollow-Sounding Tiles After Installation
- Ensure proper trowel technique - always maintain consistent angle and pressure
- For large format tiles, consider back-buttering in addition to troweling the substrate
- Remove and reinstall any hollow-sounding tiles immediately before adhesive sets
The key to successful application lies in preparation, using the right tools, and understanding how environmental conditions affect working time. I always recommend doing a small test area first, especially when working with a new adhesive or challenging substrate.
Mechanisms of Tile Adhesive Damage due to Water Immersion and Freeze-Thaw
Have you wondered why tiles sometimes fall off after winter or in constantly wet areas? The science behind these failures can help you prevent costly damage to your installations.
Water immersion damages tile adhesive through cement leaching and bond deterioration, while freeze-thaw cycles create expanding ice crystals that crack the adhesive matrix. These mechanisms weaken adhesion over time, eventually causing tiles to detach. High-polymer adhesives with proper waterproofing systems significantly reduce these risks.

I once inspected an outdoor patio in a cold climate where nearly 80% of the tiles had detached after just two winters. Understanding the science behind this failure helps explain why certain products and techniques are essential in challenging environments.
Water Immersion Damage Mechanisms
When standard tile adhesive is constantly exposed to water, several destructive processes occur:
- Cement Leaching6: Water gradually dissolves calcium hydroxide (a cement component), weakening the adhesive matrix. This process accelerates in soft or acidic water.
- Hydrolytic Degradation: Extended water exposure breaks down certain chemical bonds in the adhesive, particularly in products with insufficient polymer content.
- Substrate Swelling: Many substrates (especially wood-based ones) expand when wet, creating stress on the adhesive bond.
- Alkaline Silica Reaction: In certain conditions, components in the cement react with silica in the aggregate, forming an expansive gel that cracks the adhesive.
Freeze-Thaw Damage Mechanisms
In cold climates, water trapped in or behind tile installations creates even more severe problems:
- Ice Crystal Formation: Water expands approximately 9% when freezing, creating massive pressure within the adhesive matrix.
- Microfractures: Repeated freeze-thaw cycles create tiny cracks that gradually connect, eventually allowing complete bond failure.
- Thermal Stress: The different expansion rates of tile, adhesive, and substrate during temperature changes create additional stress on bonds.
- Moisture Path Creation: Initial small cracks allow more water to penetrate during thaw periods, accelerating damage in subsequent freeze cycles.
Practical Prevention Strategies:
The scientific understanding of these mechanisms has led to specific prevention strategies:
| Issue | Prevention Strategy | How It Works |
|---|---|---|
| Cement Leaching | High-polymer adhesives (C2S2) | Polymers encapsulate cement particles, reducing dissolution |
| Water Penetration | Waterproofing membranes | Creates barrier preventing water from reaching adhesive |
| Freeze Expansion | Air-entraining additives | Microscopic air bubbles provide space for ice expansion |
| Thermal Stress | Flexible adhesives | Higher deformation capacity absorbs movement stress |
| Joint Failure | Proper expansion joints | Accommodates movement to prevent stress transfer to adhesive |
For installations in wet areas or freeze-thaw environments, I always recommend complete waterproofing systems, not just water-resistant adhesive. This includes proper drainage, waterproofing membranes, and maintenance of water-tight grout joints.
Prevention and Repair of Tile Adhesive Bond Failure
Is your tiling project showing signs of failure with hollow sounds, cracks, or loose tiles? Understanding how to prevent and fix these issues can save your installation and avoid complete replacement.
Prevent tile adhesive bond failure by properly preparing surfaces, using the right adhesive type for your application, ensuring complete coverage, and installing movement joints. For repairs, individual tiles can be replaced by carefully removing damaged sections, cleaning the substrate, and reinstalling with appropriate adhesive.

One of my clients recently faced a major tile failure in their hotel bathroom renovation. By identifying the root cause and implementing proper repair techniques, we saved most of the installation. Bond failures happen for specific reasons that can be addressed systematically.
Prevention Strategies
The best approach to bond failure is prevention through proper installation practices:
- Surface Preparation:
- Remove all dust, oil, paint, and loose material
- Level uneven surfaces with appropriate leveling compounds
- Apply primers on porous or extremely smooth surfaces
- Ensure concrete substrates have completed their initial shrinkage (typically 28 days)
- Adhesive Selection:
- Match adhesive type to the specific application environment
- For exterior or wet areas, use deformable adhesives (C2S1 or C2S2 classification)
- For large format tiles, use adhesives specifically formulated for reduced slippage
- Consider rapid-setting formulations for areas needing quick return to service
- Proper Installation Techniques:
- Use correct notched trowel size for your tile dimensions
- Check for proper coverage (minimum 80% for dry areas, 95%+ for wet areas)
- For large tiles, use the back-buttering technique for better coverage
- Clean excess adhesive from joints before it hardens
- Movement Accommodation:
- Install perimeter expansion joints at all walls and fixed structures
- Follow industry standards for field movement joints (typically every 20-25 ft)
- Use flexible sealant rather than grout in all movement joints
- Ensure structural movement joints continue through the tile assembly
Repair Strategies
When prevention wasn't successful or you're dealing with an existing failed installation, these repair methods can help:
For Limited Failures (Few Tiles):
- Identify and Remove Damaged Tiles:
- Use an oscillating multi-tool with a grout removal blade for precise cutting
- Work carefully to avoid damaging adjacent tiles
- Remove all old adhesive from the substrate and tile if reusing
- Prepare the Substrate:
- Clean thoroughly to remove all adhesive residue
- Check for underlying moisture issues and resolve before proceeding
- Apply a bonding primer if the substrate is old or has residual adhesive
- Reinstall Properly:
- Use improved adhesive (higher polymer content) for the replacement
- Ensure 100% coverage on replacement tiles
- Allow proper curing time before grouting or using the area
For Extensive Failures:
When more than 20% of an area has failed, complete replacement is often more cost-effective and reliable than spot repairs. The process involves:
- Complete Removal:
- Remove all tiles and adhesive down to a sound substrate
- Inspect for underlying issues (moisture, structural movement, etc.)
- Address Root Causes:
- Install waterproofing membranes if moisture was an issue
- Add adequate movement joints if missing
- Repair or replace damaged substrate materials
- Reinstall Using Best Practices:
- Select appropriate materials based on the environment
- Follow manufacturer instructions precisely
- Consider hiring a certified tile installer for critical installations
I've found that most tile failures trace back to either improper adhesive selection or installation technique. Investing in quality materials and proper installation always costs less than repairing failures later.
What to Do When Tile Adhesive Cannot Be Applied?
Are you facing a situation where standard tile adhesive just won't work for your project? This common dilemma has specific solutions depending on the underlying problem.
When standard tile adhesive isn't suitable, consider alternatives like epoxy adhesives for chemical resistance, flexible mastic for problem surfaces, or modified thin-sets with primers for difficult substrates. For extremely challenging conditions like high moisture or oil contamination, specialized surface preparation or membrane systems may be necessary.
I once consulted on an industrial kitchen project where standard cement-based adhesives kept failing due to chemical exposure. Switching to an epoxy-based system solved the problem permanently. Different situations require different approaches.
Common Scenarios and Solutions:
1. Unsuitable Substrates
Some surfaces simply won't accept standard cement-based adhesives properly:
- Extremely Smooth or Non-porous Surfaces (glass, metal, polished stone)
- Solution: Use epoxy adhesives specifically designed for non-porous surfaces
- Alternative: Apply a roughening primer or etching solution first
- Example: For glass mosaic tiles, epoxy adhesives provide superior bonding
- Unstable or Flexible Surfaces
- Solution: Install a decoupling membrane before tiling
- Alternative: Use highly flexible adhesive systems (C2S2 classification)
- Caution: Some surfaces (like particle board) are never suitable for direct tiling
2. Challenging Environmental Conditions
- Chemical Exposure Areas (industrial floors, laboratories)
- Solution: Use chemical-resistant epoxy adhesives and grouts
- Important: Match the chemical resistance to the specific exposures expected
- Note: These systems are significantly more expensive but necessary
- Extreme Temperature Variations
- Solution: Use highly deformable adhesives with added flexibility
- Alternative: Install uncoupling membranes to absorb differential movement
- Consideration: Expansion joints become even more critical in these areas
3. Special Application Requirements
- Rapid Installation Needs
- Solution: Use fast-setting adhesives that cure in 2-4 hours
- Consideration: These require more skilled application as working time is reduced
- Benefit: Allow grouting and traffic the same day in many cases
- Vertical Applications with Heavy Tiles
- Solution: Use non-sag formulations specifically designed for heavy tiles
- Technique: Consider mechanical anchoring systems as supplementary support
- Approach: Install from bottom up with temporary supports
4. Severe Moisture Issues
For areas with ongoing moisture problems:
- Rising Damp in Concrete
- Solution: Install specialized moisture barriers before tiling
- Alternative: Use epoxy adhesives with moisture-tolerant properties
- Important: Address the source of moisture when possible
- Continuous Water Immersion (pools, fountains)
- Solution: Use adhesives specifically rated for continuous immersion
- System: Implement complete waterproofing systems, not just water-resistant adhesive
- Standard: Look for adhesives meeting ISO 13007 C2TE S1/S2 with immersion rating
In my experience, the key is identifying the specific challenge your project faces and selecting products designed for those exact conditions. Using standard products in specialized applications almost always leads to costly failures. When in doubt, consult with technical representatives from adhesive manufacturers who can recommend tested system solutions.
Curing and Drying Time for Tile Adhesive
Are you unsure about when it's safe to grout or walk on your newly tiled floor? Rushing this process is one of the most common causes of tile installation failures.
Tile adhesive typically requires 24-48 hours to cure before grouting, though rapid-set formulas may allow grouting in 2-4 hours. Complete curing takes 21-28 days. Factors affecting curing time include temperature, humidity, adhesive type, substrate porosity, and tile size. Rushing the process can cause bond failure.
In my early days working with tile, I made the mistake of grouting too soon on a large commercial floor. Within weeks, we saw cracking and loose tiles - an expensive lesson in patience! Understanding curing times7 is essential for successful installations.
Understanding Different Types of "Drying"
The confusion often stems from not distinguishing between different stages of the curing process:
- Initial Set: When the adhesive first stiffens and tiles shouldn't be adjusted (typically 30 minutes to 2 hours)
- Ready for Grouting: When the adhesive is firm enough to allow grouting without tile movement (typically 24-48 hours)
- Light Traffic: When floors can accept careful walking (typically 24-72 hours)
- Full Cure: When the adhesive reaches maximum strength (typically 21-28 days)
Factors Affecting Curing Time:
The wide ranges in recommended times exist because multiple factors influence how quickly adhesive cures:
| Factor | Effect on Curing Time | Practical Implication |
|---|---|---|
| Temperature | Lower temps slow curing dramatically | Below 50°F (10°C), curing may take twice as long |
| Humidity | Higher humidity slows drying but can improve cement hydration | In very dry conditions, consider light misting |
| Substrate Porosity | More porous substrates draw moisture faster | May require substrate dampening in some cases |
| Adhesive Thickness | Thicker layers take longer to cure | Use correct trowel size to avoid excess thickness |
| Tile Permeability | Non-porous tiles (porcelain, glass) slow curing | Extend minimum times by 50% for non-porous tiles |
| Adhesive Type | Modified thin-sets cure differently than mastic or epoxy | Follow specific manufacturer guidelines |
Practical Guidelines by Adhesive Type:
Standard Modified Thin-set (Cement-Based)
- Ready for grouting: 24-48 hours
- Light foot traffic: 24-72 hours
- Heavy traffic/full loading: 7-14 days
- Full cure: 21-28 days
Rapid-Set Modified Thin-set
- Ready for grouting: 2-4 hours
- Light foot traffic: 4-6 hours
- Heavy traffic: 24-48 hours
- Full cure: 7-14 days
Epoxy Adhesives
- Ready for grouting: 12-16 hours
- Light foot traffic: 24 hours
- Chemical resistance: 7 days
- Full cure: 7 days
Mastic Adhesives
- Ready for grouting: 24 hours
- Light foot traffic: 48 hours
- Full cure: 7 days
- Note: Only for dry area wall applications
Consequences of Rushing:
Ignoring proper curing times can lead to multiple problems:
- Tiles shifting during grouting, causing uneven grout lines
- Adhesive rising into grout joints, causing discoloration
- Reduced final bond strength, leading to future failures
- Moisture trapped in the adhesive layer, causing efflorescence
I always recommend adding an extra day to minimum cure times when possible, especially in less-than-ideal conditions like cool temperatures or high humidity. The patience pays off with installations that last for decades rather than months.
Proper Storage and Shelf Life of Tile Adhesive
Have you ever opened a bag of adhesive to find it hard as rock or full of lumps? Improper storage not only wastes money but can lead to failed installations even with product that looks usable.
Store tile adhesive in a cool, dry place off the floor, away from walls and protected from moisture. Unopened bags typically last 12 months from manufacture date. Once opened, use promptly or reseal tightly. Expired or improperly stored adhesive shows reduced bonding strength and workability, risking installation failure.

I once visited a contractor who couldn't understand why his tiles kept falling off despite using his "usual" adhesive. The problem? His bags had been stored in a damp shed for over a year. Storage conditions directly impact performance.
Storage Requirements for Different Adhesive Types:
Powdered Cement-Based Adhesives:
- Ideal Storage Conditions: In a dry environment with temperatures between 40-80°F (4-27°C)
- Storage Method: Elevated off concrete floors (on pallets), away from walls
- Humidity Concerns: Extremely susceptible to humidity—even atmospheric moisture can cause partial hydration
- Typical Shelf Life: 12 months from manufacture date if unopened and properly stored
- Signs of Degradation: Lumps in the powder, hardened sections, or unusual color
Pre-Mixed Adhesives (Mastics):
- Ideal Storage Conditions: Temperature-controlled environment, avoid freezing or extreme heat
- Freeze-Thaw Stability: Most can withstand a few freeze-thaw cycles, but performance degrades with each cycle
- Container Integrity: Ensure lids are tightly sealed after opening
- Typical Shelf Life: 12-24 months unopened; 2-4 weeks once opened
- Signs of Degradation: Separation, unusual smell, excessive dryness, or mold growth
Epoxy Adhesives:
-
Storage Requirements: Components must be stored separately until mixing
-
Temperature Sensitivity: Very sensitive to storage temperatures—follow manufacturer guidelines precisely
-
Typical Shelf Life: Generally 12-24 months for unmixed components
-
Special Concerns: Some hardeners can crystallize at low temperatures (can often be restored by gentle warming)
Best Practices for Storage:
- Inventory Management:
- Implement a "first in, first out" (FIFO) system
- Mark purchase dates on bags/containers
- Check manufacture dates before purchasing
- Job Site Storage:
- Keep adhesive elevated on pallets or shelves
- Cover with plastic sheeting in humid environments
- Never leave directly exposed to elements
- Store away from direct sunlight which can degrade packaging
- Partial Bag Handling:
- Transfer remaining powder to plastic bags or containers
- Remove as much air as possible before sealing
- Label with product name and date opened
- Use opened bags within 1-3 months for best results
Testing Questionable Adhesive:
If you're uncertain about stored adhesive, perform this simple test before using it on a major project:
- Mix a small amount according to manufacturer instructions
- Check for proper consistency and working properties
- Apply to a test tile and allow to cure fully
- Test bond strength by attempting to remove the tile
The cost of replacing a few bags of adhesive is minimal compared to the labor and materials required to redo a failed installation. I always advise my clients to treat adhesive as a perishable product rather than assuming it lasts indefinitely. This simple mindset prevents many costly failures.
Conclusion
Tile adhesive isn't just another construction material—it's the critical bond that ensures your tiling project succeeds or fails. By understanding the key components like HPMC and RDP, properly storing materials, allowing adequate curing time, and selecting the right product for your specific conditions, you'll avoid the top 10 most common issues that plague tile installations.
-
HPMC is a key ingredient in tile adhesives that enhances performance. Discover its role and benefits in tiling applications by exploring this resource. ↩
-
Understanding tile adhesive is crucial for ensuring a successful tiling project. Explore this link to learn about its unique properties and benefits. ↩
-
Learn about RDP and HPMC to enhance your knowledge of tile adhesives and ensure better project outcomes. ↩
-
Explore the advantages of RDP to enhance your adhesive performance and ensure successful tiling projects. ↩
-
Learn how HPMC can transform your adhesive application, providing better workability and extended open time. ↩
-
Explore this link to understand cement leaching, its impact on tile adhesive, and how to prevent it in your projects. ↩
-
Understanding curing times is crucial for successful tile installations and avoiding costly mistakes. Explore this link for detailed guidelines. ↩